Friday, December 30, 2011

Snowman Kits

I wanted a gift to give to a couple of families on my Christmas list this year and I came up with the idea for snowman kits. I am just bummed we haven't had enough snow for me to try one out yet.
And here is how I put it all together:
To make one kit, you will need 3 buttons, 8 beads, black spray paint, dowel, orange Sculpey, material for scarf, black felt, material for bag, white felt, wood glue, and sewing supplies. I bought most of my supplies on sale at JoAnns or either I had what I needed on hand already. Here is the rundown...
bag of buttons $3.59
bag of beads $3.99
shiny black spray paint $1 (from Walmart)
5/16 in dowel $0.59
sweet potato Sculpey $1.14
3/4 yrd red cozy flannel 1.87
3/4 yrd hunter cozy flannel $1.87

Start by marking off your dowel every few inches and cut with a saw. You will need 11 small sections for the eyes, mouth, and buttons. You will also need a much longer section for the nose.
Now add a little wood glue on the back of each of the buttons and inside each of the beads to be used for the eyes and mouth. Let dry.
Then give the eye and mouth pieces a couple of coats of shiny black spray paint.
I love how the carrot noses turned out. Take a scrap piece of wooden dowel and cover it with orange Sculpey, purposefully making it lumpy and imperfect. Then go at it with a butter knife making random lines all over. Follow the directions on the package and bake in the oven. I am pretty sure it took two Sculpey packages to make these three.
For the scarves I just bought the cheapest fabric I could find at JoAnns, cut it and sewed some pieces together to make it long enough. Then fray the ends if you like and you are done. In hindsight I should have looked only for fabric at least 60 inches wide and then there would be no need for sewing at all. It would have been long enough on its own.
To keep everything together make a drawstring bag with a circle bottom and sew a felt snowflake to the outside. I made my snowflake by first cutting a template out of paper (you know, the way you learned in school? By folding the paper up and then cutting up the edges with scissors?) and then pinning it to my felt to cut out.
And lastly the top hat. I love these! They were actually pretty quick to put together and turned out just how I wanted them to. I followed the tutorial at the end of this post from Make It Do. Now go make your own and hopefully you will be blessed with snow and the time to go enjoy it.

Wednesday, December 28, 2011

Polaroid Magnets

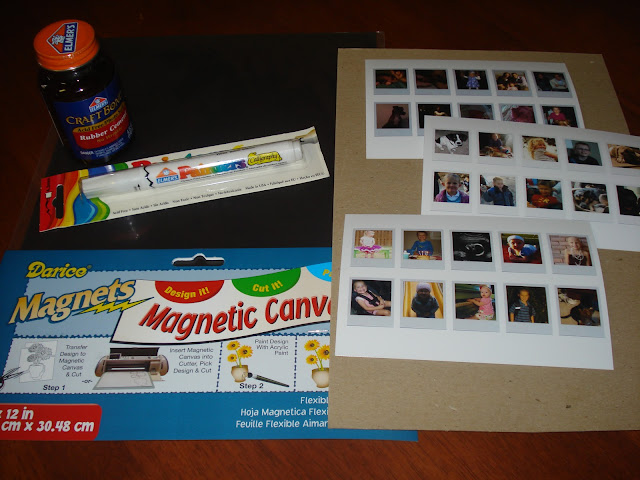
I found these tiny magnets on design mom ages ago and knew they would be a cute gift someday. They are inexpensive and can be assembled during a child's nap time. The trickiest part for me was the prep work. I used the template Ambrosia Girl graciously provided which was perfect, but I had to first learn how to use photoshop in order to use it. Thankfully hubby could teach me a few tricks and it wasn't long until I was sending the photos off to Costco to be printed.
The three 4x6 photos were about $0.40 total and the paint pen, rubber cement, and large magnet sheet were each less than $3. I also used the cardboard backing of an old notebook and some packing tape I had laying around. These supplies easily produced 30 magnets.
First you need to glue the pictures to the cardboard. Let that dry a little and then you will "laminate" each row of photos with a length of packing tape. At this point I cut each picture out and glued them to the magnet sheet. You don't have to cut them all out first, but I didn't want to waste space on my magnet (do make sure and glue to the non-magnetic side or else your magnets won't stick to the fridge). After gluing the pictures to the magnet I let them sit under a heavy book for awhile to make sure they stayed glued together really well and would be nice and flat. Then cut each polaroid out individually.
Now your project is complete unless you choose to finish up by painting the sides white to give them a polished look. It didn't seem to make much difference to me so I nixed that extra step. Put them on your fridge and enjoy.
Oh and that little girl in the photo up there? That's me three days after my first birthday on Christmas morning.

Monday, December 26, 2011

Merry Christmas

I hope your weekend was filled with waffles and sliced strawberries to top just like mine was! Merry Christmas weekend everyone.

Friday, December 23, 2011

Our Tree


I love our tree. It smells so wonderfully and it makes me smile every time I glance in its direction. I spent a long time thinking about what to do about making our own ornaments and finally I went with hubby's plan: origami. I am no origamist, but hubby spent countless hours keeping himself busy in church as a boy folding and making these little creations.
For the tree we decided on cranes and a star for the top which hubby came up with his own special design. In our front window we also made ninja stars to hang from ribbon.
Christmas is a magical time for me. I hope you all can enjoy peace at this time of year and are able to spread it to those around you as well. Have a wonderful Christmas.

Wednesday, December 21, 2011

Earflap Hat for all ages

I just finished up another gift for my daughter. It's this cute little earflap hat that really took no time at all. The pattern is free from Neanners Shop and easy enough to follow. I love the braids on either side and I know my little girl will love playing with them as well. Also it comes with directions for sizes newborn-adult so I am thinking hubby and I need matching hats as well... or is that too cheesy?
About the pattern: Instead of working this holding two strands together I worked it with only one and it turned out fine. The main yarn I used was a dusty purple from Lion Brand.

Monday, December 19, 2011

mini t-shirt blanket

Just in time for Christmas I was able to finish a little blanket I had been working on for my daughter. My hubby always goes on and on about how much he loves t-shirt blankets so I got the idea to make a mini t-shirt blanket out of some of my old blouses and t-shirts. The finished measurements ended up being about 44 by 41 inches.
Start by gathering all of your old shirts and pick out the cute ones. Then cut out the sleeves, neck, etc. so that you have a flat scrap of material. Then use a rotary blade to cut them all into nice rectangles. It doesn't matter the length of each rectangle, but you need to cut each of them out using the same height measurement.
Next lay all your rectangles out to figure out the best pattern. Don't worry if some rows are longer than others, it is easiest to cut them to size after you've sewed everything together.
Now start sewing. Sew the t-shirts into rows (I have 4) and then sew the rows together. When you are finished, cut the rectangle of t-shirts so that all of the edges are even if needed. Now cut out a piece of batting and a piece of cute cotton material the same size as your t-shirt piece and layer the material right sides together and then the batting on top of that. Pin together and sew around all the edges leaving an opening for turning. Trim the corners and turn right side out. At this point you could hand-sew the opening closed or machine sew around the entire blanket to close the turning hole.
Finally, finish off with some yarn or embroidery floss ties. I did mine about every 3 inches which I marked with a pen first to easily know where to place each tie. Also I had a hard time pulling the yarn through my blanket until I started using a much bigger needle. Then it was easily done.
I think she is going to love this blanket. It is so cozy and beautiful.

Friday, December 16, 2011

Magazine Christmas Tree

I had another craft night at my church and this time we made a Christmas decoration. Martha Stewart has a video tutorial of how to do this and I love how instead of spray paint, she covered hers with spray adhesive and glitter.
I made this miniature magazine tree out of an old National Geographic magazine and it is done simply by folding in every single page and then spray painting it if you want.

Martha Stewart's version is a little more complicated than what we came up with at craft night. Here's how we switched it up a bit:
 First, fold your page all the way into the center fold of the magazine.
 Do this a second time.
Then either fold the remaining flap up so that the bottom is now flat or fold it under so it is tucked in nice and tightly.
I just folded all of mine up and I didn't have any problems with it looking too sloppy.
Also I found that it makes a great picture/card holder and I am thinking it would be cute with a red pom pom on top... oh the possibilities!

Wednesday, December 14, 2011

The Guy Hat

I just finished this beanie for a guy on my Christmas list. It turned out to be just what I was wanting it to be. Warm with no frills. I got the pattern free on Ravelry's website and honestly I had a little trouble figuring it out. In the end it turned out perfectly and now I will know what to do for next time. The main color yarn I used was linen from Lion Brand and I used most of the skein.

Monday, December 12, 2011

Wingers

When hubby and I were dating we spent a lot of time at this restaurant called Wingers. The only thing we ever ordered were their sticky finger boneless wings. They are so good and even better cold the next day.
Then the other day I happened upon a new-to-me food blog: Favorite Family Recipes. And they happen to have a spot-on recipe to recreate those sticky fingers at home. They were perfect and really easy. And they would have looked perfect too if I could have found some decent boneless chicken wings at the store. I pared it with baked potato wedges which next time I'll add a little steak seasoning to them before baking and they will be perfect too.

Wingers Sticky Fingers:
For the sauce:
1/3 c. Franks Hot Sauce (You have to use Franks or it won't turn out just right)
1 1/2 c. brown sugar
1 Tbsp. water

Heat up hot sauce, brown sugar and water in a saucepan until all the sugar dissolves. Remove from heat and allow to cool to room temp before adding to wings OR prepare ahead of time and refrigerate. The wings turn out best if you don't pour warm sauce over them. You want it nice and thick.

For the Sticky Fingers:
1 c. oil
1 pkg. frozen breaded chicken tenders


In a frying pan, heat oil and cook chicken tenders until crispy and warm. Dip each piece of chicken in the sauce so it is completely covered and move to serving plate, pour any remaining sauce over the chicken.

Friday, December 9, 2011

Head Warmer

I came up with this easy crocheted headwarmer the other day. It's made with increasing rows of dc worked in the back loops and then decreasing down the other side. You can leave it at that or finish it with ss all around the edge. Securely add two buttons to the back and you are done. Embellish with a great big rose if you like.
I hotglued a circle of felt with a clip stuck in a slot in the middle to the back of the rose to make it removable. A nice quick gift.

Wednesday, December 7, 2011

Suitcase Redo

I found this old suitcase at a yard sale and knew my sister would love it. Her birthday was fairly close and it was only $5 so I couldn't resist. Only problem was that it was wet inside and therefore also very moldy and smelly. yuck.
First thing we tore out all of the inner lining and doused the whole thing in clorox.
The wood that was left needing a little sanding to get the last bit of glue up and then we painted it this beautiful blue. On top of that we added a protective layer of clear coat (which stunk for days). My husband and I debated on whether or not to ditch the center divider thingy and in the end we kept it. First I taped a piece of cardboard to the existing bar.
Then I taped a layer of cotton batting around the entire divider.
I sewed a simple 3-sided cover to fit over the divider and then ironed the open side up into a nice little hem which I simply hot glued together to keep the cover in place.
Good bye yucky moldy suitcase. Hello beautiful.

Monday, December 5, 2011

Calzones

I made this giant calzone the other day and it was really good and pretty simple to make. I also made a couple for my baby girl's birthday party and it was a hit.
Thaw, and let rise, a loaf of frozen bread dough on a greased cookie sheet.
Once bread has thawed and risen, dump about 2 TBS olive oil over the loaf then smash down like you are making a pizza. Flip over a couple times to make sure olive oil is coated everywhere.
 
Along one half of the dough layer:
1/3 lb. sandwich pepperoni
1/3 lb. cooked salami
1 small tomato sliced thin
Green and or red peppers sliced very thin
Onion sliced very thin
1/3 lb. provolone cheese
Shredded mozzarella cheese
 
Fold dough over to cover ingredients and seal edges all around.
 
Sprinkle the top with:
Parmesan cheese
Diced garlic or garlic powder
Italian seasoning
 
Bake at 350 degrees for 30 minutes
Serves at least 4 adults
Dip in spaghetti or pizza sauce. (I used a little bit of a jar of Ragu)

Friday, December 2, 2011

What I'm Reading

I know you're up in heaven, God,
and can hear my voice from there.
I'm just a little child.
Will you answer my short prayer?
This Little Prayer of Mine by Anthony DeStefano is such a beautiful little book. It follows a little child’s prayer from beginning to end and illustrates everything the child is feeling along the way. A child’s prayer is the sweetest thing and this book captures that special innocence. With its sing-song tone, I immediately was swept away with DeStefano’s words. I also love the illustrations. Each page is so pretty and filled with imagination. This is a book that I can see cherishing for many years to come as my daughter gets older.
My favorite part is that the book only tells one child’s prayer and doesn’t go any further.  It leaves the door open for the parent to step in with a discussion about their own personal beliefs about the importance of prayer and the power that can come with that. It would be the perfect opportunity to strengthen your child’s convictions on a regular basis.

***I received this book for free from WaterBrook Multnomah Publishing Group for this review

Wednesday, November 30, 2011

for my Bathroom

My sister has a really cool old tool box on the back of her toilet to hold extra rolls. My solution isn't quite as nifty, but it gets the job done.
I started with this wicker basket I thrifted and added some shiny blue spray paint I bought from Walmart for about a dollar.
And now my toilet paper rolls have a proper home :)
Now I am thinking I need something pretty for the walls.

Monday, November 28, 2011

Going Fishing Toy

I found this cute fishing game and thought it would be a great gift for two of my nieces. I followed this tutorial, but did things just a little differently. I meant for the game to work for a 2 and 4 year old, but I think 4 is as young as this would probably work for.
First I drew out my own pattern on a piece of printer paper and made just one fish to make sure I liked it and that the magnet was strong enough to hold up the fish. After that I did the rest factory line style and pounded them out.
The two fishing poles were made from cutting one cheap dowel from Home Depot in half and tying some yarn to one end. After I tied it I also used a little wood glue to keep it in place. The "chum" was just a small piece of material sewed in a circle with a magnet inside and the other side of the yarn securely attached.
Each of the fish were hand-stitched closed and I attached washers to their "noses". Lastly I hot glued some felt  numbers to each fish to make the game a little more interesting.
My nieces loved it. They are 4 and 2 years old. I think the game turned out way too advanced for the 2 year old, but she still had fun trying. And my 1 year old also loved gathering the fish and eating them. I think I may have to make up a bunch of softies just for her.

The magnets, washers and dowel I bought at Home Depot all for less then $5. The rest was scraps of fabric and batting from my stash.