Showing posts with label crafts. Show all posts

Thursday, April 19, 2012

Quick Headband

With a quick trip to Idaho in the works I managed to squeeze in the time to make a headband for my daughter to wear on Easter Sunday.
I started with a pre-made stretchy headband and added some bias tape with hot glue to make a base for the clippie to attach.
Using a free pattern I crocheted this super quick little flower. To the original chain 27, I added a few extra chains in order to make a slightly larger flower.
 To the back of the flower I hot glued a metal clip and then hot glued a felt circle on top of that.
Complete! And very cute. Too bad my daughter refused to wear the headband, but thank goodness the removable clippie worked either way.
I think my daughter has gone long enough without a bunch of mama-made hair accessories. With how easy this whipped up I think I'll be up for making more to go with every outfit.

Wednesday, April 4, 2012

Mini Photo Book

I put together this little photo album for my daughter to flip through when I need her quietly occupied. It is a compilation of mostly pictures of her, but also pictures of my husband and I as children and of course, a few pictures of our dog.
It wasn't important for this to be a high-quality keepsake. My main goal was to complete the book quickly. I did go through the extra effort to add labels to each photo using picasa, but I made sure it was a very quick process. 
I cropped every photo to be oriented the same way even if it made the picture awkward so that it would be easier for my 1 year old to flip through and look at each picture at the correct angle.
The flip book cost me a dollar at walmart and was meant to hold 24 pictures. Using the front and back sleeve you could easily fit in an extra 4. I left the very back blank so I ended up with 27 total photos. My cover photo was a 4x6 just like the others, but I then cut it down slightly to show the existing backdrop.
As evidence of her little fingers being in practically every photo, my daughter loves her book. (Who doesn't love looking at themselves?) I want to make another one featuring extended family members and one showcasing the letters of the alphabet. Such an easy and rewarding "craft".

Tuesday, April 3, 2012

Easter Basket

It is April and Easter is almost here. Last year my daughter was only a couple of months old and missed out on the festivities. I think this year she'll be old enough to "hunt" for her own eggs. So of course I had to come up with a cute basket for her to hold all her goodies in! Here is my free-to-me solution:
I started with this basket I have had sitting around forever that a friend donated to me.
I didn't like the existing gold ribbon so I replaced it with this thick white lace trim using a little hot glue here and there to keep it from slipping off. I also added thin pink ribbon with hot glue around the body of the basket.
Finally I added a bunch of rosettes over the ribbon seam. I am pretty sure most of the rosettes were made from old t-shirts.
I can't wait to see this little basket in action!

Friday, March 23, 2012

Pipe Cleaner Matching Game

Here is another great, easy, cheap activity I put together for our upcoming road trip. The activity simply involves sticking the pipe cleaners through the holes. For older kids it can also be a color matching game (stick the correctly colored pipe cleaner through its coordinating hole.) I found the idea for this here.
 
In order to make this for your own toddler, take an old canister (chip or oatmeal containers work great) and pop holes in the top. I found using a pen or thick nail worked much better than a knife. Add reinforcement labels to each hole and color them if desired. Since my daughter is so young my final step was to fold each pipe cleaner in half to make it easier for her. Easy right?
I also went a step further and covered my container in material. I would have used paper, but this is what I had on hand and I didn't want to buy anything. I hemmed two sides using my sewing machine, glued the top hem to the top of the cannister using hot glue, and glued the side hem over the side raw edge. On the bottom I made cuts every few inches in order to glue down smoothly.
Honestly, my sixteen-month old has a hard time doing this. She does try really hard and it holds her attention for a while, but it isn't easy for her. I don't think it will be too much longer that she will be able to fully enjoy this though.

Wednesday, March 21, 2012

Ruffled Clutch

A friend and I got together to do some crafting and I worked up this cute little clutch. I just love it! The free pattern came from Noodlehead.com and it was easier than I originally thought including sewing in my very first zipper.
Here is all of the crafting goodness laid out all over her living room. Her daughter was kind enough to happily bounce in a doorway swing the whole time and keep us entertained. It was wonderful and I had an excuse to get some projects out of the way.
The hardest part honestly was choosing which fabrics I wanted from my stash and then cutting out all of the pieces. I didn't have any fusible interfacing and used an extra piece of muslin in its place. Also my zipper started out way too long, but it wasn't a problem to just shorten it with some scissors.
I love all of the options Noodlehead gives for inside compartments. I added two cardholder spots to mine. 

I am seeing more of these in my future.

Friday, March 16, 2012

Discovery Balls

We have an upcoming 6 hour drive and my daughter is in that stage where she refuses to sit still. She just wants to run. To make the trip go a little easier I have been researching some new activities fit for a 16 month old that we can take in the car with us. I will be posting several of them here in the next couple of weeks. First up... discovery balls.
They are just like stress balls, but filled with different substances so she can discover the different textures and squishy-ness levels. So far the one filled with beans is definitely her favorite. These were a very quick project and cheap too.
To make your own you will need:
balloons
filler (beans, rice, flour, etc.)
funnel (optional)

My only cost was a pack of 20 helium quality balloons I bought for $1. Helium quality balloons are nice because they are thicker and less likely to pop a hole, but any balloon would work.

Now fill your balloons up one by one. If you do not have a funnel, it is easiest if you have a helper who can shove the stuffing in while you hold the opening open. If you do have a funnel, simply stuff the spout in the opening and fill the funnel with your filler a little at a time. You'll need to continually push the filler inside the balloon down to create a little well and stretch your balloon out. Also you'll probably need to shake the filler down the spout because it tends to get a little jammed up in the spout.

When you reach your desired size, tie off and enjoy.
I have seen these balls decorated with hair and faces and it comes out pretty cute. Also one blog suggested filling with playdough which I think would be a cool substance to play with.

***Also, if you decide to make these and let young children play with them, be careful not to let them use the discovery balls as a chew toy.

Thursday, March 15, 2012

Another Scarfette

I crocheted another scarfette recently. I love it because it is a fairly quick and easy gift. Maybe one of these days I will make one for myself...
The basic idea is just take any scarf design that you like, shorten it, and add buttons to one end. I used this scarf pattern.

Monday, March 5, 2012

USA magnets

Hubby loves maps, history, and all that stuff so I knew he would love this as a gift. It is a puzzle made out of a map of the United States with magnets attached to the back of each piece. Great for hubby and great as a teaching tool later for my little girl.
Here's how I pulled it all together for less than $8. I started with a poster map I bought for less than $2 at a local teacher/homeschool supply store. I don't have a picture of the poster because I had to cut it up before I brought it home in order to keep it a secret from hubby. From there I glued the map in sections onto cardstock I already had on hand using rubber cement. It is best if you cut the map up as little as possible before this step because it makes it a lot easier.
After the glue has dried, cut all the states out. I found that sometimes it was a lot easier using these tiny craft scissors on some of the more "squiggly" states. By the way... if you happen to get tired of cutting and accidentally cut the tail off of Alaska at the very end, it is an easy fix. Simply glue the state onto another piece of cardstock and cut it out again. It will be a little thicker, but not enough to matter.
Next you will laminate your states. I found a genealogy and copy center which has self-service laminating machines at a good price. I chose to use hard lamination which is a bit more expensive but apparently it works better with thicker products. It cost me a little more than a dollar to do this. Next cut out your states leaving a bit of a border.
Add strips of magnets to the back of each and your project is complete! I bought this roll of magnets from Lowes for about $3.50 and had some left over as well.
I think it would be cool to do this same project using family pictures or significant landscapes as well. Oh the possibilities... 

Friday, February 17, 2012

Crayon Holder

I haven't felt like doing much lately so when inspiration hit I got right to work. I wanted a little pouch to hold a couple of crayons and paper to carry around in my purse for my daughter. She is 1 and has just begun to color so I didn't want to have a ton of crayons in the holder-- actually I'll probably only keep about three. I also wanted a little place to hold small pieces of paper or this cute little notebook I bought 3 for $2 on sale at Target.
I didn't write up a real tutorial for this little holder because I was hurrying and there are a ton of tutorials floating around if you are wanting to make something similar. My measurements for the two main pieces were 10 3/4 x 6 1/2 and for the strip holding the crayons in place is a folded over piece that was 10 3/4 x 4 1/2. The final piece is the 2 1/2 x 3 3/4 tab to hold the velcro that keeps the holder together. I used velcro specifically because I thought it would be easy enough for me daughter to handle herself.
And there you have it. A quick and cute little holder for my budding artist.

Friday, February 10, 2012

Sunglasses Case

A few years ago a good friend of mine gave me this cute sunglass case...
For mother's day I used that case as a guide to create this case for my mother who always throws her glasses into her purse and they get so scratched up...
Well she happened to lose that case somewhere and requested another for her birthday. It was so long ago I basically had to re-figure out how I was going to do it, but luckily this time I documented the process! These directions will make a large case... like for those trendy huge sunglasses. If you want to make the same thing for smaller, eye-glasses, you'll need to size down the dimensions.
All seams are 1/4 inch unless specified. Start with a 9x8 inch rectangle of main fabric (flowers), lining fabric (orange), and batting. You will also need a 3 1/2 inch square of your lining fabric and batting plus some velcro and other sewing necessities.
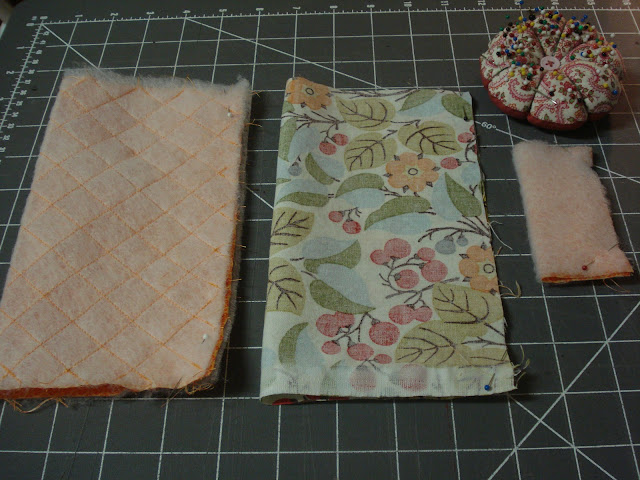
Pin the 9x8 lining fabric to the batting with the right side out. At this point I like to quilt the fabric using this diamond pattern, but you could use any pattern you like or simplify things and just sew around the entire edge of the rectangle and move on. If you are going to do a pattern, it is easiest to mark out your pattern first with a water soluble pen and then sew, or just eye-ball it like I did. It doesn't need to be perfect. After all, it is only the lining. To do the diamonds, turn your fabric so that a corner is facing towards you and another corner is facing away from you. Start sewing parallel lines. When you have sewn across the entire rectangle, turn the fabric again so that you can now sew perpendicular lines to the ones you just finished.
Now fold the quilted fabric over right side in. You should be folding the 9 inch side of the fabric and the 8 inch side will give you the height of the case. Fold your main fabric the same way, right side in. Place the 3 1/2 inch square on top of the batting and fold that one over as well, right side in.
 Sew around one long side and one short side of each of the three pieces of fabric and then trim the corners.
Turn the main fabric and the small fabric right side out. Now cut a piece of velcro to be about 1 1/2 inches long (my velcro was 3/4 inches wide). Sew one side of the velcro to the main fabric being careful not to sew through both pieces of material. Center the velcro about 1 inch down from the raw edge of the open side of the case. Next, sew the other piece of velcro to the small piece of fabric going through all pieces of material. Center the velcro about 3/4 inches down from the finished edge of the tab.
Fold the raw edge of the main fabric down and inside the case about 3/4 inches and iron into place. Do the same thing with the lining except fold the fabric down and out.
Push the lining inside of the main fabric and line up the sewn, long sides together inside the case. Pin the open side of the tab in between the lining and main fabric on the back side of the case. Make sure you have put the tab in correctly in order to coordinate with the other piece of velcro. Edge stitch around the top of the case making sure the two fabrics are lined up perfectly and that you sew over the tab a few times to give it strength.
And now you have yourself one completed and very cute sunglasses case for yourself or a friend. enjoy.

Monday, February 6, 2012

Valentines Decor

We are not huge into the Valentines holiday around here, but I thought it would be nice to add a little touch of Valentines to my front door. All I did was add a couple of hearts to my current wreath I've had since November.
For the purple heart, cut two strips of felt 1x4 inches. For the white heart, cut two strips of felt 1x6 inches. Hot glue them all together and add a piece of thread to the middle to hang from the top of your wreath. Not much effort and only uses scraps. Sounds like the perfect addition to my decor.

Wednesday, February 1, 2012

Sweet Little Valentine

I came up with this sweet little valentine to give to a couple of women in my life along with a cute little hairclip for my little one.
Start by cross stitching a heart on a pretty little piece of fabric. I used three strands of red embroidery thread (Usually embroidery thread is composed of 6 individual strands... cut a length of thread and pull the rope apart into two ropes of 3 strands each). If you've never cross stitched before, it is easy enough. Just sew a bunch of x's using an embroidery hoop.
Use a button covering kit to cover 1 1/8 inch buttons. My button kit came with buttons with flat backs so it was easy to then simply hot glue a 1 inch pin to the backs.
If your buttons do not have flat backs, like my 5/8 inch button, it is really simple to squeeze the back off with pliers.
To make an easy hair clip, fill the back of a 5/8 inch button with hot glue and stick the end of the hair clip in it.
 Stick the hair clip in a cute head of hair and you are done. Easy enough.
Each of the pins I attached to card stock to finish up my little gift. The easiest way to do this would be if you had a printer, paper cutter, corner rounder, and hand held hole puncher. I don't have any of these things so I went about it the old-fashioned way. The card stock I cut out using a ruler and scissors and then rounded the corners also using scissors. I only have a 3-hole punch so it limits where I can put my holes, but still works. If you have a working printer you could print right onto your card stock using some cute fonts. Mine is broken so handwritten it is.
 Happy crafting!