Showing posts with label gift ideas. Show all posts

Wednesday, March 21, 2012

Ruffled Clutch

A friend and I got together to do some crafting and I worked up this cute little clutch. I just love it! The free pattern came from Noodlehead.com and it was easier than I originally thought including sewing in my very first zipper.
Here is all of the crafting goodness laid out all over her living room. Her daughter was kind enough to happily bounce in a doorway swing the whole time and keep us entertained. It was wonderful and I had an excuse to get some projects out of the way.
The hardest part honestly was choosing which fabrics I wanted from my stash and then cutting out all of the pieces. I didn't have any fusible interfacing and used an extra piece of muslin in its place. Also my zipper started out way too long, but it wasn't a problem to just shorten it with some scissors.
I love all of the options Noodlehead gives for inside compartments. I added two cardholder spots to mine. 

I am seeing more of these in my future.

Friday, February 10, 2012

Sunglasses Case

A few years ago a good friend of mine gave me this cute sunglass case...
For mother's day I used that case as a guide to create this case for my mother who always throws her glasses into her purse and they get so scratched up...
Well she happened to lose that case somewhere and requested another for her birthday. It was so long ago I basically had to re-figure out how I was going to do it, but luckily this time I documented the process! These directions will make a large case... like for those trendy huge sunglasses. If you want to make the same thing for smaller, eye-glasses, you'll need to size down the dimensions.
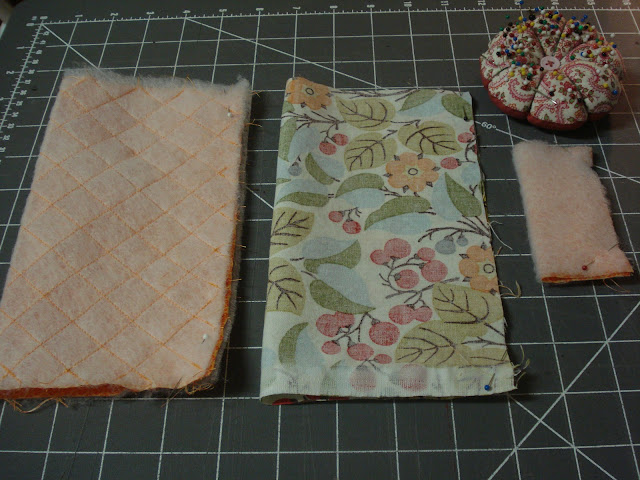
All seams are 1/4 inch unless specified. Start with a 9x8 inch rectangle of main fabric (flowers), lining fabric (orange), and batting. You will also need a 3 1/2 inch square of your lining fabric and batting plus some velcro and other sewing necessities.
Pin the 9x8 lining fabric to the batting with the right side out. At this point I like to quilt the fabric using this diamond pattern, but you could use any pattern you like or simplify things and just sew around the entire edge of the rectangle and move on. If you are going to do a pattern, it is easiest to mark out your pattern first with a water soluble pen and then sew, or just eye-ball it like I did. It doesn't need to be perfect. After all, it is only the lining. To do the diamonds, turn your fabric so that a corner is facing towards you and another corner is facing away from you. Start sewing parallel lines. When you have sewn across the entire rectangle, turn the fabric again so that you can now sew perpendicular lines to the ones you just finished.
Now fold the quilted fabric over right side in. You should be folding the 9 inch side of the fabric and the 8 inch side will give you the height of the case. Fold your main fabric the same way, right side in. Place the 3 1/2 inch square on top of the batting and fold that one over as well, right side in.
 Sew around one long side and one short side of each of the three pieces of fabric and then trim the corners.
Turn the main fabric and the small fabric right side out. Now cut a piece of velcro to be about 1 1/2 inches long (my velcro was 3/4 inches wide). Sew one side of the velcro to the main fabric being careful not to sew through both pieces of material. Center the velcro about 1 inch down from the raw edge of the open side of the case. Next, sew the other piece of velcro to the small piece of fabric going through all pieces of material. Center the velcro about 3/4 inches down from the finished edge of the tab.
Fold the raw edge of the main fabric down and inside the case about 3/4 inches and iron into place. Do the same thing with the lining except fold the fabric down and out.
Push the lining inside of the main fabric and line up the sewn, long sides together inside the case. Pin the open side of the tab in between the lining and main fabric on the back side of the case. Make sure you have put the tab in correctly in order to coordinate with the other piece of velcro. Edge stitch around the top of the case making sure the two fabrics are lined up perfectly and that you sew over the tab a few times to give it strength.
And now you have yourself one completed and very cute sunglasses case for yourself or a friend. enjoy.

Friday, December 30, 2011

Snowman Kits

I wanted a gift to give to a couple of families on my Christmas list this year and I came up with the idea for snowman kits. I am just bummed we haven't had enough snow for me to try one out yet.
And here is how I put it all together:
To make one kit, you will need 3 buttons, 8 beads, black spray paint, dowel, orange Sculpey, material for scarf, black felt, material for bag, white felt, wood glue, and sewing supplies. I bought most of my supplies on sale at JoAnns or either I had what I needed on hand already. Here is the rundown...
bag of buttons $3.59
bag of beads $3.99
shiny black spray paint $1 (from Walmart)
5/16 in dowel $0.59
sweet potato Sculpey $1.14
3/4 yrd red cozy flannel 1.87
3/4 yrd hunter cozy flannel $1.87

Start by marking off your dowel every few inches and cut with a saw. You will need 11 small sections for the eyes, mouth, and buttons. You will also need a much longer section for the nose.
Now add a little wood glue on the back of each of the buttons and inside each of the beads to be used for the eyes and mouth. Let dry.
Then give the eye and mouth pieces a couple of coats of shiny black spray paint.
I love how the carrot noses turned out. Take a scrap piece of wooden dowel and cover it with orange Sculpey, purposefully making it lumpy and imperfect. Then go at it with a butter knife making random lines all over. Follow the directions on the package and bake in the oven. I am pretty sure it took two Sculpey packages to make these three.
For the scarves I just bought the cheapest fabric I could find at JoAnns, cut it and sewed some pieces together to make it long enough. Then fray the ends if you like and you are done. In hindsight I should have looked only for fabric at least 60 inches wide and then there would be no need for sewing at all. It would have been long enough on its own.
To keep everything together make a drawstring bag with a circle bottom and sew a felt snowflake to the outside. I made my snowflake by first cutting a template out of paper (you know, the way you learned in school? By folding the paper up and then cutting up the edges with scissors?) and then pinning it to my felt to cut out.
And lastly the top hat. I love these! They were actually pretty quick to put together and turned out just how I wanted them to. I followed the tutorial at the end of this post from Make It Do. Now go make your own and hopefully you will be blessed with snow and the time to go enjoy it.

Wednesday, December 28, 2011

Polaroid Magnets

I found these tiny magnets on design mom ages ago and knew they would be a cute gift someday. They are inexpensive and can be assembled during a child's nap time. The trickiest part for me was the prep work. I used the template Ambrosia Girl graciously provided which was perfect, but I had to first learn how to use photoshop in order to use it. Thankfully hubby could teach me a few tricks and it wasn't long until I was sending the photos off to Costco to be printed.
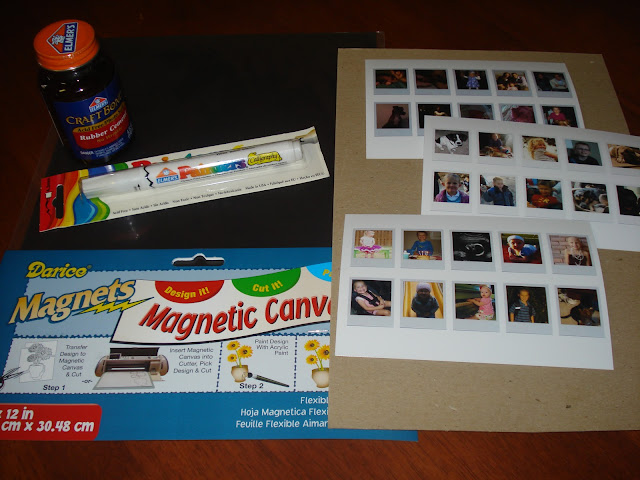
The three 4x6 photos were about $0.40 total and the paint pen, rubber cement, and large magnet sheet were each less than $3. I also used the cardboard backing of an old notebook and some packing tape I had laying around. These supplies easily produced 30 magnets.
First you need to glue the pictures to the cardboard. Let that dry a little and then you will "laminate" each row of photos with a length of packing tape. At this point I cut each picture out and glued them to the magnet sheet. You don't have to cut them all out first, but I didn't want to waste space on my magnet (do make sure and glue to the non-magnetic side or else your magnets won't stick to the fridge). After gluing the pictures to the magnet I let them sit under a heavy book for awhile to make sure they stayed glued together really well and would be nice and flat. Then cut each polaroid out individually.
Now your project is complete unless you choose to finish up by painting the sides white to give them a polished look. It didn't seem to make much difference to me so I nixed that extra step. Put them on your fridge and enjoy.
Oh and that little girl in the photo up there? That's me three days after my first birthday on Christmas morning.

Wednesday, December 21, 2011

Earflap Hat for all ages

I just finished up another gift for my daughter. It's this cute little earflap hat that really took no time at all. The pattern is free from Neanners Shop and easy enough to follow. I love the braids on either side and I know my little girl will love playing with them as well. Also it comes with directions for sizes newborn-adult so I am thinking hubby and I need matching hats as well... or is that too cheesy?
About the pattern: Instead of working this holding two strands together I worked it with only one and it turned out fine. The main yarn I used was a dusty purple from Lion Brand.

Wednesday, December 14, 2011

The Guy Hat

I just finished this beanie for a guy on my Christmas list. It turned out to be just what I was wanting it to be. Warm with no frills. I got the pattern free on Ravelry's website and honestly I had a little trouble figuring it out. In the end it turned out perfectly and now I will know what to do for next time. The main color yarn I used was linen from Lion Brand and I used most of the skein.

Friday, December 9, 2011

Head Warmer

I came up with this easy crocheted headwarmer the other day. It's made with increasing rows of dc worked in the back loops and then decreasing down the other side. You can leave it at that or finish it with ss all around the edge. Securely add two buttons to the back and you are done. Embellish with a great big rose if you like.
I hotglued a circle of felt with a clip stuck in a slot in the middle to the back of the rose to make it removable. A nice quick gift.

Monday, November 28, 2011

Going Fishing Toy

I found this cute fishing game and thought it would be a great gift for two of my nieces. I followed this tutorial, but did things just a little differently. I meant for the game to work for a 2 and 4 year old, but I think 4 is as young as this would probably work for.
First I drew out my own pattern on a piece of printer paper and made just one fish to make sure I liked it and that the magnet was strong enough to hold up the fish. After that I did the rest factory line style and pounded them out.
The two fishing poles were made from cutting one cheap dowel from Home Depot in half and tying some yarn to one end. After I tied it I also used a little wood glue to keep it in place. The "chum" was just a small piece of material sewed in a circle with a magnet inside and the other side of the yarn securely attached.
Each of the fish were hand-stitched closed and I attached washers to their "noses". Lastly I hot glued some felt  numbers to each fish to make the game a little more interesting.
My nieces loved it. They are 4 and 2 years old. I think the game turned out way too advanced for the 2 year old, but she still had fun trying. And my 1 year old also loved gathering the fish and eating them. I think I may have to make up a bunch of softies just for her.

The magnets, washers and dowel I bought at Home Depot all for less then $5. The rest was scraps of fabric and batting from my stash.

Monday, November 14, 2011

dinner roll holder

When I first saw this dinner roll holder I thought it was the cutest thing and wanted an excuse to make one. I ended up making one for a gift and filling it with candy because it seemed empty without yummy rolls in it. I think it would be so much fun to someday host a big dinner and have a couple of these beautiful holders on the table.
 It folds flat for easy storage. So handy.
I can not wait for Thanksgiving. What could be better? Family, food, and beautiful fall.

Friday, September 30, 2011

Baby Beanie and Booties

A dear friend of mine had her first child a few weeks ago and I knew her little girl would need some booties. All little girls do.

I decided to go ahead and purchase a pattern because all of the cutest patterns come at a cost and I knew I would use it over and over anyway. I love them. The first bootie I tried came out huge. But then I used a smaller hook and that seemed to do the trick.

I also made a hat to match which was very simple and will be warm for that sweet little head. I made the hat a little bigger by increasing an extra round because the pattern was meant for a preemie.

And of course the hat needed a cute flower which I made into a removable clip using hot glue and a clippie. It was easier than expected because I usually shy away from crocheted flowers that need to be sewn but it came out perfectly.

The yarn I used was so soft and it was fun to make little baby things again. Baby projects are fast and oh so rewarding (especially because it gives you an excuse to visit a tiny angel).

Friday, February 4, 2011

Indoor Frisbees

What to make for a cousins gift exchange for my five-year-old nephew for under $5? Why not some fabric frisbees?! Genius. These were so quick to make and yes, they actually do fly. It's a good thing too because I did not have a backup plan.

**About the pattern: I played around with the stabilizing stitch in the middle and instead of only doing the circle, I also tried a spiral and a star design. In the end I think the circle design was probably best because the more stitching I did in the middle, the wonkier the entire shape of the frisbee became. It is nice to mix things up a little though.

Saturday, January 29, 2011

Sanitizing Carriers

I thought these hand sanitizer holder's were so cute and so I just had to try it out. I love the punch of color this brings to my bag and it is so useful when I'm out and about with my baby girl and don't really want to touch her after loading groceries, touching shopping carts, etc. Now I need to make one to fit a small bottle of lotion. This dry winter has finally caught up to my poor hands. Can you believe I never made a button hole before this project? The flower I crocheted and glued on as a last-minute idea.

Tuesday, January 4, 2011

Diaper Pouch

I did this for a friend's baby shower in the middle of the night, the night before the party. So yes, it is far from perfect and I actually made a huge mistake which I couldn't undo because it was a cutting mistake. So lame. Apparently since giving birth I no longer can sew even a simple envelope. But I do love these fabrics, so it doesn't matter that the end result was a little wonky right? Right.


I plan on making at least one more of these for myself, but I may need one for my bag, my car, my bedroom, etc. They are handy little pouches.

Sunday, January 2, 2011

a Simple Craft

I saw these pocket tissue holders a few weeks ago and thought they would make the cutest little gift.
And so I ended up making three. They were so easy and used only scraps of leftover material. Who knew tissue holders could be so cute? I think I could enjoy making tons and tons of these...
**A note about the pattern: I found it is easiest if you make your turning hole on one of the long sides so that it gets closed when you sew the sides into a fold on the final sewing step