Showing posts with label sewing. Show all posts

Wednesday, March 21, 2012

Ruffled Clutch

A friend and I got together to do some crafting and I worked up this cute little clutch. I just love it! The free pattern came from Noodlehead.com and it was easier than I originally thought including sewing in my very first zipper.
Here is all of the crafting goodness laid out all over her living room. Her daughter was kind enough to happily bounce in a doorway swing the whole time and keep us entertained. It was wonderful and I had an excuse to get some projects out of the way.
The hardest part honestly was choosing which fabrics I wanted from my stash and then cutting out all of the pieces. I didn't have any fusible interfacing and used an extra piece of muslin in its place. Also my zipper started out way too long, but it wasn't a problem to just shorten it with some scissors.
I love all of the options Noodlehead gives for inside compartments. I added two cardholder spots to mine. 

I am seeing more of these in my future.

Friday, February 17, 2012

Crayon Holder

I haven't felt like doing much lately so when inspiration hit I got right to work. I wanted a little pouch to hold a couple of crayons and paper to carry around in my purse for my daughter. She is 1 and has just begun to color so I didn't want to have a ton of crayons in the holder-- actually I'll probably only keep about three. I also wanted a little place to hold small pieces of paper or this cute little notebook I bought 3 for $2 on sale at Target.
I didn't write up a real tutorial for this little holder because I was hurrying and there are a ton of tutorials floating around if you are wanting to make something similar. My measurements for the two main pieces were 10 3/4 x 6 1/2 and for the strip holding the crayons in place is a folded over piece that was 10 3/4 x 4 1/2. The final piece is the 2 1/2 x 3 3/4 tab to hold the velcro that keeps the holder together. I used velcro specifically because I thought it would be easy enough for me daughter to handle herself.
And there you have it. A quick and cute little holder for my budding artist.

Friday, February 10, 2012

Sunglasses Case

A few years ago a good friend of mine gave me this cute sunglass case...
For mother's day I used that case as a guide to create this case for my mother who always throws her glasses into her purse and they get so scratched up...
Well she happened to lose that case somewhere and requested another for her birthday. It was so long ago I basically had to re-figure out how I was going to do it, but luckily this time I documented the process! These directions will make a large case... like for those trendy huge sunglasses. If you want to make the same thing for smaller, eye-glasses, you'll need to size down the dimensions.
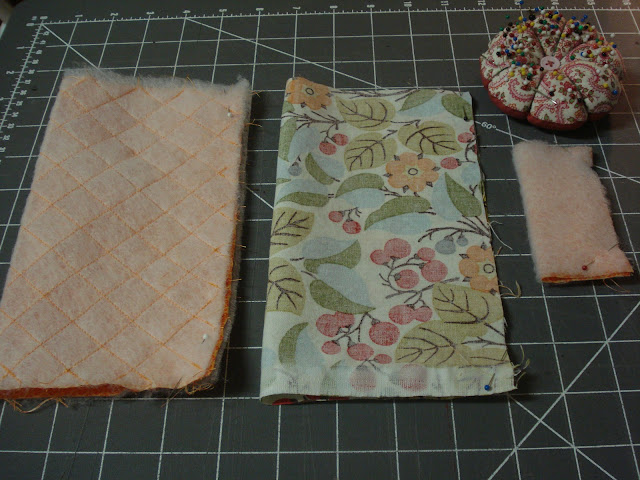
All seams are 1/4 inch unless specified. Start with a 9x8 inch rectangle of main fabric (flowers), lining fabric (orange), and batting. You will also need a 3 1/2 inch square of your lining fabric and batting plus some velcro and other sewing necessities.
Pin the 9x8 lining fabric to the batting with the right side out. At this point I like to quilt the fabric using this diamond pattern, but you could use any pattern you like or simplify things and just sew around the entire edge of the rectangle and move on. If you are going to do a pattern, it is easiest to mark out your pattern first with a water soluble pen and then sew, or just eye-ball it like I did. It doesn't need to be perfect. After all, it is only the lining. To do the diamonds, turn your fabric so that a corner is facing towards you and another corner is facing away from you. Start sewing parallel lines. When you have sewn across the entire rectangle, turn the fabric again so that you can now sew perpendicular lines to the ones you just finished.
Now fold the quilted fabric over right side in. You should be folding the 9 inch side of the fabric and the 8 inch side will give you the height of the case. Fold your main fabric the same way, right side in. Place the 3 1/2 inch square on top of the batting and fold that one over as well, right side in.
 Sew around one long side and one short side of each of the three pieces of fabric and then trim the corners.
Turn the main fabric and the small fabric right side out. Now cut a piece of velcro to be about 1 1/2 inches long (my velcro was 3/4 inches wide). Sew one side of the velcro to the main fabric being careful not to sew through both pieces of material. Center the velcro about 1 inch down from the raw edge of the open side of the case. Next, sew the other piece of velcro to the small piece of fabric going through all pieces of material. Center the velcro about 3/4 inches down from the finished edge of the tab.
Fold the raw edge of the main fabric down and inside the case about 3/4 inches and iron into place. Do the same thing with the lining except fold the fabric down and out.
Push the lining inside of the main fabric and line up the sewn, long sides together inside the case. Pin the open side of the tab in between the lining and main fabric on the back side of the case. Make sure you have put the tab in correctly in order to coordinate with the other piece of velcro. Edge stitch around the top of the case making sure the two fabrics are lined up perfectly and that you sew over the tab a few times to give it strength.
And now you have yourself one completed and very cute sunglasses case for yourself or a friend. enjoy.

Monday, December 19, 2011

mini t-shirt blanket

Just in time for Christmas I was able to finish a little blanket I had been working on for my daughter. My hubby always goes on and on about how much he loves t-shirt blankets so I got the idea to make a mini t-shirt blanket out of some of my old blouses and t-shirts. The finished measurements ended up being about 44 by 41 inches.
Start by gathering all of your old shirts and pick out the cute ones. Then cut out the sleeves, neck, etc. so that you have a flat scrap of material. Then use a rotary blade to cut them all into nice rectangles. It doesn't matter the length of each rectangle, but you need to cut each of them out using the same height measurement.
Next lay all your rectangles out to figure out the best pattern. Don't worry if some rows are longer than others, it is easiest to cut them to size after you've sewed everything together.
Now start sewing. Sew the t-shirts into rows (I have 4) and then sew the rows together. When you are finished, cut the rectangle of t-shirts so that all of the edges are even if needed. Now cut out a piece of batting and a piece of cute cotton material the same size as your t-shirt piece and layer the material right sides together and then the batting on top of that. Pin together and sew around all the edges leaving an opening for turning. Trim the corners and turn right side out. At this point you could hand-sew the opening closed or machine sew around the entire blanket to close the turning hole.
Finally, finish off with some yarn or embroidery floss ties. I did mine about every 3 inches which I marked with a pen first to easily know where to place each tie. Also I had a hard time pulling the yarn through my blanket until I started using a much bigger needle. Then it was easily done.
I think she is going to love this blanket. It is so cozy and beautiful.

Wednesday, December 7, 2011

Suitcase Redo

I found this old suitcase at a yard sale and knew my sister would love it. Her birthday was fairly close and it was only $5 so I couldn't resist. Only problem was that it was wet inside and therefore also very moldy and smelly. yuck.
First thing we tore out all of the inner lining and doused the whole thing in clorox.
The wood that was left needing a little sanding to get the last bit of glue up and then we painted it this beautiful blue. On top of that we added a protective layer of clear coat (which stunk for days). My husband and I debated on whether or not to ditch the center divider thingy and in the end we kept it. First I taped a piece of cardboard to the existing bar.
Then I taped a layer of cotton batting around the entire divider.
I sewed a simple 3-sided cover to fit over the divider and then ironed the open side up into a nice little hem which I simply hot glued together to keep the cover in place.
Good bye yucky moldy suitcase. Hello beautiful.

Monday, November 28, 2011

Going Fishing Toy

I found this cute fishing game and thought it would be a great gift for two of my nieces. I followed this tutorial, but did things just a little differently. I meant for the game to work for a 2 and 4 year old, but I think 4 is as young as this would probably work for.
First I drew out my own pattern on a piece of printer paper and made just one fish to make sure I liked it and that the magnet was strong enough to hold up the fish. After that I did the rest factory line style and pounded them out.
The two fishing poles were made from cutting one cheap dowel from Home Depot in half and tying some yarn to one end. After I tied it I also used a little wood glue to keep it in place. The "chum" was just a small piece of material sewed in a circle with a magnet inside and the other side of the yarn securely attached.
Each of the fish were hand-stitched closed and I attached washers to their "noses". Lastly I hot glued some felt  numbers to each fish to make the game a little more interesting.
My nieces loved it. They are 4 and 2 years old. I think the game turned out way too advanced for the 2 year old, but she still had fun trying. And my 1 year old also loved gathering the fish and eating them. I think I may have to make up a bunch of softies just for her.

The magnets, washers and dowel I bought at Home Depot all for less then $5. The rest was scraps of fabric and batting from my stash.

Monday, November 14, 2011

dinner roll holder

When I first saw this dinner roll holder I thought it was the cutest thing and wanted an excuse to make one. I ended up making one for a gift and filling it with candy because it seemed empty without yummy rolls in it. I think it would be so much fun to someday host a big dinner and have a couple of these beautiful holders on the table.
 It folds flat for easy storage. So handy.
I can not wait for Thanksgiving. What could be better? Family, food, and beautiful fall.

Wednesday, November 9, 2011

Birthday Crown

We had a wonderful little party for my (baby) girl the other day to celebrate her first birthday. It was very simple: food, cake, presents, and family. We all had so much fun and I was glad we were able to pull it together at the last minute.
One thing I knew my little girl needed for her birthday was a crown. Every little girl needs a crown on her birthday don't you think?
All you need to make a crown of your own is two layers of felt, one layer of cute material, thread, velcro, and embellishments. I started by free-hand drawing the shape I wanted the crown to be. You could do this too or I know there are templates around blogland you could also find and use. Cut out a piece of felt giving yourself a 1/4 inch border and adding a long strip on the base of the crown long enough to velcro the crown in place in the back of your child's head. From end to end mine was 20.5 inches long for my one year old.
Using the cut felt as a pattern piece, cut out your cotton material. Then, placing right sides together,  sew these two pieces together with a 1/4 inch seam allowance sewing all the way around except for the entire bottom length of the crown.
Turn right side out and sew the bottom closed. It should now look like a crown. Sew or glue on your embellishment over the bottom seam to hide the raw edge.
Then I cut a 'J' out of felt and sewed it in the middle of the crown for my daughter's first initial. You could also use a number for their age or something cute like a ladybug.
Cut a small piece of velcro and sew it on one of the long ends of the crown on the cotton material side.
Now take your crown and use it as a template to cut one more piece of felt. Cut a larger piece of velcro (make sure it is the opposite piece to the velcro you already sewed on) and sew it onto the felt on the opposite side of the crown from your first piece of velcro. You will then glue the felt to the back of the crown covering up all of your sewing and giving sturdiness to the entire project.
Now hopefully your daughter won't spend the entire night trying to pull her crown off her cute little head and you'll be able to get some memorable photos.

Wednesday, November 2, 2011

a Curtain for the Bathroom

In our apartment we have a functional bathroom. That is about all it is. It needed a little life breathed into it. I thought I would start with a little color for the window.
My little window measured in at 22 inches square so I started off with a 25 by 44 inch piece of material. I first hemmed the two short sides and then the long bottom side. Then to create the top sleeve for the rod to go through, I ironed down the top about a quarter of an inch and then ironed it down again about an inch and a half then sewed along the bottom edge of the hem.
I love this floral pattern. In fact, I bought extra yardage for another upcoming project. It just makes me happy to look at.

Friday, September 23, 2011

Sewing Machine Cozy

My mother-in-law bought this beautiful fabric for me last year so that I could make myself a sewing machine cover. I found several designs online and then decided to just make up my own. Well then the project sat around until I saw this cute idea.

I didn't actually follow the directions since it looked pretty straight forward and I was starting with pre-quilted fabric anyway. I think I started with about 1/2 yard of this fabric from JoAnns, cut out a rectangle, sewed exactly 3 yards of bias tape around the edges, and attached some green ribbon for ties. I meant to attach the ties underneath the bias tape, but got carried away with sewing and forgot. I ended up just sewing the ties directly to the bias tape afterwards with a zigzag stitch.

I love how it turned out. So easy. It is already brightening up my dark sewing room.

Sunday, February 6, 2011

a Dog Pillow

My dog has this terrible bed we bought for her after we first got her. And she loves it. I do not. It is brown and lifeless and never looks clean. We also had this HUGE cuddle bag I bought my hubby secondhand for really cheap made out of foam bits...
Big huh? She also loved that bag. But it turned out way too big to fit into our apartment and so we decided to dismantle it. Most of the foam we threw away, but a lot of it we kept for ourselves in trash bags. And that eight foot long cuddle bag became a perfect sized pillow for our little puppy.


I made this pillow by first sewing a simple square pillow out of a cheap sheet and filled it with the foam. Then I sewed an envelope pillow using the fabric from the original cuddle bag. I wanted it to be easily removed for washing and that fabric is great because it really is heavy duty and cleans beautifully. And if ever I get tired of the fabric I'll just make another cover for the pillow. easy peasy. And almost completely free (I think I spent 3 dollars for the sheet at walmart and didn't even use half of the material).

And you know what? She loves it just as much as the ugly one.